This blog discuss about my research work and projects related to artificial intelligence, Internet of things, Embedded systems,Data science, Machine learning and deep learning
Monday, April 24, 2023
GPS sensor interface with ESP8266 using Blynk IoT cloud
Tuesday, November 1, 2022
IoT based Smart Notice Board using Node MCU
Circuit Diagram:
#include <ESP8266WiFi.h>
#include <ESPAsyncTCP.h>
#include <ESPAsyncWebServer.h>
#include <SPI.h>
#include <Wire.h>
#include <Adafruit_GFX.h>
#include <Adafruit_SSD1306.h>
#define OLED_RESET LED_BUILTIN //4
Adafruit_SSD1306 display(OLED_RESET);
#define SSD1306_LCDHEIGHT 64
#if (SSD1306_LCDHEIGHT != 64)
#error("Height incorrect, please fix Adafruit_SSD1306.h!");
#endif
AsyncWebServer server(80);
const char* ssid = "******"; //replace ssid and password with your wifi network credentials
const char* password = "*********";
const char* PARAM_INPUT_1 = "input1";
const char index_html[] PROGMEM = R"=====(
<!DOCTYPE HTML><html><head>
<title>Smart Notice Board</title>
<meta name="viewport" content="width=device-width, initial-scale=5">
<p> <font size="9" face="sans-serif"> <marquee> Smart Notice Board </marquee> </font> </p>
</head><body><center>
<form action="/get">
Enter Text to Display: <input type="text" name="input1">
<input type="submit" value="Send">
</form><br>
</center></body></html>rawliteral";
void notFound(AsyncWebServerRequest *request) {
request->send(404, "text/plain", "Not found");
)=====";
void setup() {
Serial.begin(115200);
display.begin(SSD1306_SWITCHCAPVCC, 0x3C);
delay(2000);
display.clearDisplay();
display.setTextSize(1);
display.setTextColor(WHITE);
display.setCursor(0, 0);
// Display static text
display.println("Notice Board");
display.display();
delay(100);
WiFi.mode(WIFI_STA);
WiFi.begin(ssid, password);
if (WiFi.waitForConnectResult() != WL_CONNECTED) {
Serial.println("WiFi Failed!");
return;
}
Serial.println();
Serial.print("IP Address: ");
Serial.println(WiFi.localIP());
server.on("/", HTTP_GET, [](AsyncWebServerRequest *request){
request->send_P(200, "text/html", index_html);
});
server.on("/get", HTTP_GET, [] (AsyncWebServerRequest *request) {
String message;
String inputParam;
if (request->hasParam(PARAM_INPUT_1)) {
message = request->getParam(PARAM_INPUT_1)->value();
inputParam = PARAM_INPUT_1;
display.clearDisplay();
display.setTextSize(1);
display.setTextColor(WHITE);
display.setCursor(0, 24);
display.println(message);
display.display();
}
else {
message = "No message sent";
inputParam = "none";
}
Serial.println(message);
request->send(200, "text/html", index_html);
});
server.begin();
}
void loop() {
display.startscrollleft(0x00, 0x0F);
delay(2000);
}
Monday, October 31, 2022
Internet based Digital Clock using esp8266 and OLED display
Circuit Diagram
Program Code:
#include <ESP8266WiFi.h>
#include <time.h>
#include <SPI.h>
#include <Wire.h>
#include <Adafruit_GFX.h>
#include <Adafruit_SSD1306.h>
#define OLED_RESET LED_BUILTIN //4
Adafruit_SSD1306 display(OLED_RESET);
const char* ssid = "******";
const char* password = "*******";
int ledPin = 13;
int timezone = 5.5 * 3600;
int dst = 0;
#define SSD1306_LCDHEIGHT 64
#if (SSD1306_LCDHEIGHT != 64)
#error("Height incorrect, please fix Adafruit_SSD1306.h!");
#endif
void setup() {
display.begin(SSD1306_SWITCHCAPVCC, 0x3C);
// Clear the buffer.
display.clearDisplay();
display.display();
pinMode(ledPin,OUTPUT);
digitalWrite(ledPin,LOW);
Serial.begin(115200);
display.setTextSize(1);
display.setTextColor(WHITE);
display.setCursor(0,0);
display.println("Wifi connecting to ");
display.println( ssid );
WiFi.begin(ssid,password);
display.println("\nConnecting");
display.display();
while( WiFi.status() != WL_CONNECTED ){
delay(500);
display.print(".");
display.display();
}
// Clear the buffer.
display.clearDisplay();
display.display();
display.setCursor(0,0);
display.println("Wifi Connected!");
display.print("IP:");
display.println(WiFi.localIP() );
display.display();
configTime(timezone, dst, "pool.ntp.org","time.nist.gov");
display.println("\nWaiting for NTP...");
while(!time(nullptr)){
Serial.print("*");
delay(1000);
}
display.println("\nTime response....OK");
display.display();
delay(1000);
display.clearDisplay();
display.display();
}
void loop() {
time_t now = time(nullptr);
struct tm* p_tm = localtime(&now);
Serial.print(p_tm->tm_mday);
Serial.print("/");
Serial.print(p_tm->tm_mon + 1);
Serial.print("/");
Serial.print(p_tm->tm_year + 1900);
Serial.print(" ");
Serial.print(p_tm->tm_hour);
Serial.print(":");
Serial.print(p_tm->tm_min);
Serial.print(":");
Serial.println(p_tm->tm_sec);
// Clear the buffer.
display.clearDisplay();
display.setTextSize(3);
display.setTextColor(WHITE);
display.setCursor(0,0);
display.print(p_tm->tm_hour);
display.print(":");
if( p_tm->tm_min <10)
display.print("0");
display.print(p_tm->tm_min);
display.setTextSize(2);
display.setCursor(90,5);
display.print(".");
if( p_tm->tm_sec <10)
display.print("0");
display.print(p_tm->tm_sec);
display.setTextSize(1);
display.setCursor(0,40);
display.print(p_tm->tm_mday);
display.print("/");
display.print(p_tm->tm_mon + 1);
display.print("/");
display.print(p_tm->tm_year + 1900);
display.display();
delay(1000); // update every 1 sec
}
Internet based analog clock using OLED display and ESP8266
Circuit Diagram:
#include <ESP8266WiFi.h>
#include <time.h>
#include <SPI.h>
#include <Wire.h>
#include <Adafruit_GFX.h>
#include <Adafruit_SSD1306.h>
#define OLED_RESET LED_BUILTIN //4
Adafruit_SSD1306 display(OLED_RESET);
const char* ssid = "*******";
const char* password = "**********";
int ledPin = 13;
int timezone = 5.5 * 3600;
int dst = 0;
#define SSD1306_LCDHEIGHT 64
#if (SSD1306_LCDHEIGHT != 64)
#error("Height incorrect, please fix Adafruit_SSD1306.h!");
#endif
void setup() {
display.begin(SSD1306_SWITCHCAPVCC, 0x3C);
// Clear the buffer.
display.clearDisplay();
display.display();
pinMode(ledPin,OUTPUT);
digitalWrite(ledPin,LOW);
Serial.begin(115200);
display.setTextSize(1);
display.setTextColor(WHITE);
display.setCursor(0,0);
display.println("Wifi connecting to ");
display.println( ssid );
WiFi.begin(ssid,password);
display.println("\nConnecting");
display.display();
while( WiFi.status() != WL_CONNECTED ){
delay(500);
display.print(".");
display.display();
}
// Clear the buffer.
display.clearDisplay();
display.display();
display.setCursor(0,0);
display.println("Wifi Connected!");
display.print("IP:");
display.println(WiFi.localIP() );
display.display();
configTime(timezone, dst, "pool.ntp.org","time.nist.gov");
display.println("\nWaiting for NTP...");
while(!time(nullptr)){
Serial.print("*");
delay(1000);
}
display.println("\nTime response....OK");
display.display();
delay(1000);
display.clearDisplay();
display.display();
}
void loop() {
time_t now = time(nullptr);
struct tm* p_tm = localtime(&now);
int r = 35;
// Now draw the clock face
display.drawCircle(display.width()/2, display.height()/2, 2, WHITE);
//
//hour ticks
for( int z=0; z < 360;z= z + 30 ){
//Begin at 0° and stop at 360°
float angle = z ;
angle=(angle/57.29577951) ; //Convert degrees to radians
int x2=(64+(sin(angle)*r));
int y2=(32-(cos(angle)*r));
int x3=(64+(sin(angle)*(r-5)));
int y3=(32-(cos(angle)*(r-5)));
display.drawLine(x2,y2,x3,y3,WHITE);
}
// display second hand
float angle = p_tm->tm_sec*6 ;
angle=(angle/57.29577951) ; //Convert degrees to radians
int x3=(64+(sin(angle)*(r)));
int y3=(32-(cos(angle)*(r)));
display.drawLine(64,32,x3,y3,WHITE);
//
// display minute hand
angle = p_tm->tm_min * 6 ;
angle=(angle/57.29577951) ; //Convert degrees to radians
x3=(64+(sin(angle)*(r-3)));
y3=(32-(cos(angle)*(r-3)));
display.drawLine(64,32,x3,y3,WHITE);
//
// display hour hand
angle = p_tm->tm_hour * 30 + int((p_tm->tm_min / 12) * 6 );
angle=(angle/57.29577951) ; //Convert degrees to radians
x3=(64+(sin(angle)*(r-11)));
y3=(32-(cos(angle)*(r-11)));
display.drawLine(64,32,x3,y3,WHITE);
display.setTextSize(1);
display.setCursor((display.width()/2)+10,(display.height()/2) - 3);
display.print(p_tm->tm_mday);
// update display with all data
display.display();
delay(100);
display.clearDisplay();
}
Tuesday, October 18, 2022
Node MCU with Blynk IOT to calculate distance using ultrsonic sensor
Circuit Diagram:
Program Code:
#define BLYNK_PRINT Serial
#include <ESP8266WiFi.h>
#include <BlynkSimpleEsp8266.h>
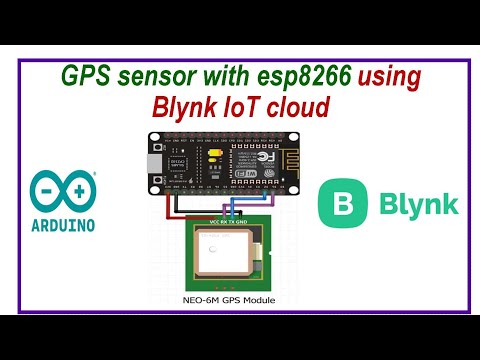
#define trig D2
#define echo D1
long duration;
int distance;
#define BLYNK_TEMPLATE_ID "**********"
#define BLYNK_DEVICE_NAME "************"
#define BLYNK_AUTH_TOKEN "*******************"
char auth[] = BLYNK_AUTH_TOKEN; // You should get Auth Token in the Blynk App.
char ssid[] = "******"; //Enter your WIFI name
char pass[] = "********"; //Enter your WIFI password
BlynkTimer timer;
WidgetLCD lcd(V1);
void setup()
{
// Debug console
pinMode(trig, OUTPUT); // Sets the trigPin as an Output
pinMode(echo, INPUT); // Sets the echoPin as an Inpu
Serial.begin(9600);
Blynk.begin(auth, ssid, pass, "blynk.cloud", 80);
timer.setInterval(1000L, sendSensor);
}
void loop()
{
Blynk.run();
timer.run();
}
void sendSensor()
{
digitalWrite(trig, LOW); // Makes trigPin low
delayMicroseconds(2); // 2 micro second delay
digitalWrite(trig, HIGH); // tigPin high
delayMicroseconds(10); // trigPin high for 10 micro seconds
digitalWrite(trig, LOW); // trigPin low
duration = pulseIn(echo, HIGH); //Read echo pin, time in microseconds
distance = duration * 0.034 / 2; //Calculating actual/real distance
Serial.print("Distance = "); //Output distance on arduino serial monitor
Serial.println(distance);
Blynk.virtualWrite(V0, distance);
lcd.print(0, 0, "trendy_coding"); // use: (position X: 0-15, position Y: 0-1, "Message you want to print")
lcd.print(0, 1, "Distance: " + String(distance) + "cm ");
delay(1000);
}
Monday, October 17, 2022
Node red with ESP8266 to display DHT sensor
Circuit Diagram
Program Code:
#include <ESP8266WiFi.h>
#include <DHT.h>
#include <WiFiClient.h>
#include <ESP8266WebServer.h>
#include <ESP8266mDNS.h>
/************************* Pin Definition *********************************/
//DHT11 for reading temperature and humidity value
#define DHTPIN D7
String temp;
String hum;
#define DHTTYPE DHT11 // DHT 11
DHT dht(DHTPIN, DHTTYPE);
// Your WiFi credentials.
// Set password to "" for open networks.
const char* ssid = "*******";
const char* password = "*******";
ESP8266WebServer server(80);
void handleRoot() {
server.send(200, "text/plain", "hello from esp8266!");
}
void handleNotFound() {
String message = "File Not Found\n\n";
message += "URI: ";
message += server.uri();
message += "\nMethod: ";
message += (server.method() == HTTP_GET) ? "GET" : "POST";
message += "\nArguments: ";
message += server.args();
message += "\n";
for (uint8_t i = 0; i < server.args(); i++) {
message += " " + server.argName(i) + ": " + server.arg(i) + "\n";
}
server.send(404, "text/plain", message);
}
void setup()
{
// Debug console
Serial.begin(115200);
WiFi.begin(ssid, password);
Serial.println("");
// Wait for connection
while (WiFi.status() != WL_CONNECTED) {
delay(500);
Serial.print(".");
}
Serial.println("");
Serial.print("Connected to ");
Serial.println(ssid);
Serial.print("IP address: ");
Serial.println(WiFi.localIP());
dht.begin();
server.on("/", handleRoot); // http://localIPAddress/
server.on("/dht-temp", []() // http://localIPAddress/dht-temp
{
int t = dht.readTemperature();
temp = String(t);
server.send(200, "text/plain", temp);
});
server.on("/dht-hum", []() // http://localIPAddress/dht-hum
{
int h = dht.readHumidity();
hum = String(h);
server.send(200, "text/plain", hum);
});
server.onNotFound(handleNotFound);
server.begin();
Serial.println("HTTP server started");
}
void loop()
{
server.handleClient();
}
Node-red JSON file
[
{
"id": "64f52903c284b545",
"type": "tab",
"label": "Flow 1",
"disabled": false,
"info": ""
},
{
"id": "30a7782ba04b1a60",
"type": "ui_gauge",
"z": "64f52903c284b545",
"name": "",
"group": "a7841362.ae40c",
"order": 1,
"width": 0,
"height": 0,
"gtype": "gage",
"title": "Temperature Data",
"label": "deg C",
"format": "{{value}}",
"min": 0,
"max": "100",
"colors": [
"#00b500",
"#e6e600",
"#ca3838"
],
"seg1": "",
"seg2": "",
"className": "",
"x": 490,
"y": 480,
"wires": []
},
{
"id": "e6a00cc180f7067b",
"type": "http request",
"z": "64f52903c284b545",
"name": "",
"method": "GET",
"ret": "txt",
"paytoqs": "ignore",
"url": "192.168.43.243/dht-temp",
"tls": "",
"persist": false,
"proxy": "",
"authType": "",
"senderr": false,
"x": 300,
"y": 480,
"wires": [
[
"30a7782ba04b1a60"
]
]
},
{
"id": "691c4dc63f202da8",
"type": "inject",
"z": "64f52903c284b545",
"name": "",
"props": [
{
"p": "payload"
},
{
"p": "topic",
"vt": "str"
}
],
"repeat": "3",
"crontab": "",
"once": false,
"onceDelay": 0.1,
"topic": "",
"payload": "",
"payloadType": "date",
"x": 130,
"y": 480,
"wires": [
[
"e6a00cc180f7067b"
]
]
},
{
"id": "48feb7d8a567f7a7",
"type": "ui_gauge",
"z": "64f52903c284b545",
"name": "",
"group": "a7841362.ae40c",
"order": 1,
"width": 0,
"height": 0,
"gtype": "gage",
"title": "Humidity Data",
"label": "%",
"format": "{{value}}",
"min": 0,
"max": "100",
"colors": [
"#00b500",
"#e6e600",
"#ca3838"
],
"seg1": "",
"seg2": "",
"className": "",
"x": 1040,
"y": 420,
"wires": []
},
{
"id": "3392fb2a675e207b",
"type": "http request",
"z": "64f52903c284b545",
"name": "",
"method": "GET",
"ret": "txt",
"paytoqs": "ignore",
"url": "192.168.43.243/dht-hum",
"tls": "",
"persist": false,
"proxy": "",
"authType": "",
"senderr": false,
"x": 850,
"y": 420,
"wires": [
[
"48feb7d8a567f7a7"
]
]
},
{
"id": "60b07f05b391fec5",
"type": "inject",
"z": "64f52903c284b545",
"name": "",
"props": [
{
"p": "payload"
},
{
"p": "topic",
"vt": "str"
}
],
"repeat": "5",
"crontab": "",
"once": false,
"onceDelay": 0.1,
"topic": "",
"payload": "",
"payloadType": "date",
"x": 670,
"y": 420,
"wires": [
[
"3392fb2a675e207b"
]
]
},
{
"id": "a7841362.ae40c",
"type": "ui_group",
"name": "My studio",
"tab": "2ff36ff5.bdc628",
"order": 1,
"disp": true,
"width": "6",
"collapse": false
},
{
"id": "2ff36ff5.bdc628",
"type": "ui_tab",
"name": "Studio_control",
"icon": "dashboard",
"disabled": false,
"hidden": false
}
]
GPS sensor interface with ESP8266 using Blynk IoT cloud
Circuit diagram: Source Code: #include <TinyGPS++.h> #include <SoftwareSerial.h> #define BLYNK_PRINT Serial #include <ESP8...

-
Circuit Diagram Program Code: #include <ESP8266WiFi.h> #include <DHT.h> #include <WiFiClient.h> #include <ESP8266WebSer...
-
Program code RTC.C #include <LPC213X.H> #include "LCD.h" #include "Delays.h" /**********Function Prototype******...
-
A virtual keyboard using OpenCV is a graphical interface that allows users to type without the need for a physical keyboard. It provides a...